NLPExplainer on IMDB dataset
The class NLPExplainer is designed for NLP tasks, acting as a factory of the supported NLP explainers such as integrated-gradient and LIME. NLPExplainer provides a unified easy-to-use interface for all the supported explainers. Because the supported NLP explainers in the current version are limited, one can either use NLPExplainer or a specific explainer in the package omnixai.explainers.nlp to generate explanations.
[1]:
# This default renderer is used for sphinx docs only. Please delete this cell in IPython.
import plotly.io as pio
pio.renderers.default = "png"
[2]:
import numpy as np
import pandas as pd
import torch
import torch.nn as nn
import sklearn
from sklearn.datasets import fetch_20newsgroups

from omnixai.data.text import Text
from omnixai.preprocessing.text import Word2Id
from omnixai.explainers.tabular.agnostic.L2X.utils import Trainer, InputData, DataLoader
from omnixai.explainers.nlp import NLPExplainer
from omnixai.visualization.dashboard import Dashboard
We apply a simple CNN model for this text classification task. Note that the method forward has two inputs inputs (token ids) and masks (the sentence masks). Note that the first input of the model must be the token ids.
[3]:
class TextModel(nn.Module):

    def __init__(self, num_embeddings, num_classes, **kwargs):
        super().__init__()
        self.num_embeddings = num_embeddings
        self.embedding_size = kwargs.get("embedding_size", 50)
        self.embedding = nn.Embedding(self.num_embeddings, self.embedding_size)
        self.embedding.weight.data.normal_(mean=0.0, std=0.01)

        hidden_size = kwargs.get("hidden_size", 100)
        kernel_sizes = kwargs.get("kernel_sizes", [3, 4, 5])
        if type(kernel_sizes) == int:
            kernel_sizes = [kernel_sizes]

        self.activation = nn.ReLU()
        self.conv_layers = nn.ModuleList([
            nn.Conv1d(self.embedding_size, hidden_size, k, padding=k // 2) for k in kernel_sizes])
        self.dropout = nn.Dropout(0.2)
        self.output_layer = nn.Linear(len(kernel_sizes) * hidden_size, num_classes)

    def forward(self, inputs, masks):
        embeddings = self.embedding(inputs)
        x = embeddings * masks.unsqueeze(dim=-1)
        x = x.permute(0, 2, 1)
        x = [self.activation(layer(x).max(2)[0]) for layer in self.conv_layers]
        outputs = self.output_layer(self.dropout(torch.cat(x, dim=1)))
        if outputs.shape[1] == 1:
            outputs = outputs.squeeze(dim=1)
        return outputs
A Text object is used to represent a batch of texts/sentences. The package omnixai.preprocessing.text provides some transforms related to text data such as Tfidf and Word2Id.
[4]:
# Load the training and test datasets
train_data = pd.read_csv('/home/ywz/data/imdb/labeledTrainData.tsv', sep='\t')
n = int(0.8 * len(train_data))
x_train = Text(train_data["review"].values[:n])
y_train = train_data["sentiment"].values[:n].astype(int)
x_test = Text(train_data["review"].values[n:])
y_test = train_data["sentiment"].values[n:].astype(int)
class_names = ["negative", "positive"]
# The transform for converting words/tokens to IDs
transform = Word2Id().fit(x_train)
The preprocessing function converts a batch of texts into token IDs and the masks. The outputs of the preprocessing function must fit the inputs of the model.
[5]:
max_length = 256
device = "cuda" if torch.cuda.is_available() else "cpu"

def preprocess(X: Text):
    samples = transform.transform(X)
    max_len = 0
    for i in range(len(samples)):
        max_len = max(max_len, len(samples[i]))
    max_len = min(max_len, max_length)
    inputs = np.zeros((len(samples), max_len), dtype=int)
    masks = np.zeros((len(samples), max_len), dtype=np.float32)
    for i in range(len(samples)):
        x = samples[i][:max_len]
        inputs[i, :len(x)] = x
        masks[i, :len(x)] = 1
    return inputs, masks
We now train the CNN model and evaluate its performance.
[6]:
model = TextModel(
    num_embeddings=transform.vocab_size,
    num_classes=len(class_names)
).to(device)

Trainer(
    optimizer_class=torch.optim.AdamW,
    learning_rate=1e-3,
    batch_size=128,
    num_epochs=10,
).train(
    model=model,
    loss_func=nn.CrossEntropyLoss(),
    train_x=transform.transform(x_train),
    train_y=y_train,
    padding=True,
    max_length=max_length,
    verbose=True
)
|████████████████████████████████████████| 100.0% Complete, Loss 0.0010
[7]:
model.eval()
data = transform.transform(x_test)
data_loader = DataLoader(
    dataset=InputData(data, [0] * len(data), max_length),
    batch_size=32,
    collate_fn=InputData.collate_func,
    shuffle=False
)
outputs = []
for inputs in data_loader:
    value, mask, target = inputs
    y = model(value.to(device), mask.to(device))
    outputs.append(y.detach().cpu().numpy())
outputs = np.concatenate(outputs, axis=0)
predictions = np.argmax(outputs, axis=1)
print('Test accuracy: {}'.format(
    sklearn.metrics.f1_score(y_test, predictions, average='binary')))
Test accuracy: 0.8492442322991249
Similar to TabularExplainer, to initialize NLPExplainer, we need to set the following parameters:
explainers: The names of the explainers to apply, e.g., [“ig”, “lime”].model: The ML model to explain, e.g., a scikit-learn model, a tensorflow model or a pytorch model.preprocess: The preprocessing function converting the raw data (aTextinstance) into the inputs of model.postprocess: The postprocessing function transforming the outputs of model to a user-specific form, e.g., the predicted probability for each class.mode: The task type, e.g., “classification” or “regression”.
The preprocessing function takes a Text instance as its input and outputs the processed features that the ML model consumes, e.g., the Text object is converted into pytorch tensors in this example.
The postprocessing function converts the outputs into class probabilities.
[8]:
# The preprocessing function
preprocess_func = lambda x: tuple(torch.tensor(y).to(device) for y in preprocess(x))
# The postprocessing function
postprocess_func = lambda logits: torch.nn.functional.softmax(logits, dim=1)
# Initialize a NLPExplainer
explainer = NLPExplainer(
    explainers=["ig", "lime", "polyjuice"],
    mode="classification",
    model=model,
    preprocess=preprocess_func,
    postprocess=postprocess_func,
    params={"ig": {"embedding_layer": model.embedding,
                   "id2token": transform.id_to_word}}
)
There is no “global explanation” for NLPExplainer currently. One can simply call explainer.explain to generate local explanations for NLP tasks.
[9]:
x = Text([
"it was a fantastic performance!",
"best film ever",
"such a great show!",
"it was a horrible movie",
"i've never watched something as bad"
])
# Generates explanations
local_explanations = explainer.explain(x)
print("Integrated gradient results:")
local_explanations["ig"].ipython_plot(class_names=class_names)
print("LIME results:")
local_explanations["lime"].ipython_plot(class_names=class_names)
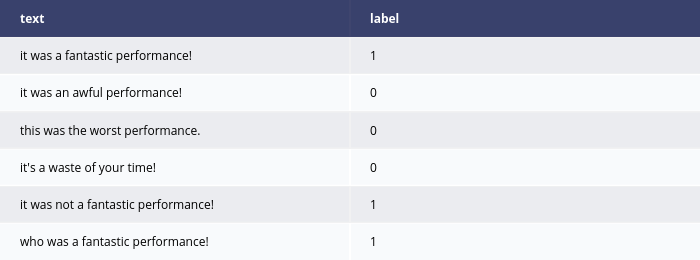
print("Counterfactual results:")
local_explanations["polyjuice"].ipython_plot()
INFO:polyjuice.polyjuice_wrapper:Setup Polyjuice.
INFO:polyjuice.polyjuice_wrapper:Setup SpaCy processor.
INFO:polyjuice.polyjuice_wrapper:Setup perplexity scorer.
Asking to truncate to max_length but no maximum length is provided and the model has no predefined maximum length. Default to no truncation.
Integrated gradient results:
LIME results:
Counterfactual results:
Given the generated explanations, we can launch a dashboard (a Dash app) for visualization by setting the test instances and the generated local explanations.
[10]:
# Launch a dashboard for visualization
dashboard = Dashboard(
    instances=x,
    local_explanations=local_explanations,
    class_names=class_names
)
dashboard.show()
Dash is running on http://127.0.0.1:8050/
INFO:omnixai.visualization.dashboard:Dash is running on http://127.0.0.1:8050/
 * Serving Flask app "omnixai.visualization.dashboard" (lazy loading)
 * Environment: production
   WARNING: This is a development server. Do not use it in a production deployment.
   Use a production WSGI server instead.
 * Debug mode: off
INFO:werkzeug: * Running on http://127.0.0.1:8050/ (Press CTRL+C to quit)