Grad-CAM for image classification (Tensorflow)
This is an example of Grad-CAM on image classification with a Tensorflow model. If using this explainer, please cite “Grad-CAM: Visual Explanations from Deep Networks via Gradient-based Localization, Selvaraju et al., https://arxiv.org/abs/1610.02391”.
[1]:
# This default renderer is used for sphinx docs only. Please delete this cell in IPython.
import plotly.io as pio
pio.renderers.default = "png"
[2]:
import json
import numpy as np
import tensorflow as tf
from tensorflow.keras.applications import mobilenet_v2
from PIL import Image as PilImage

from omnixai.data.image import Image
from omnixai.preprocessing.image import Resize
from omnixai.explainers.vision.specific.gradcam import GradCAM
We recommend using Image to represent a batch of images. Image can be constructed from a numpy array or a Pillow image. The following code loads one test image and resizes them to (224, 224).
[3]:
# Load the test image
img = Resize((224, 224)).transform(Image(PilImage.open('../data/images/dog_cat_2.png').convert('RGB')))
# Load the class names
with open('../data/images/imagenet_class_index.json', 'r') as read_file:
    class_idx = json.load(read_file)
    idx2label = [class_idx[str(k)][1] for k in range(len(class_idx))]
In this example, we apply a MobileNetV2 model for image classification.
[4]:
model = mobilenet_v2.MobileNetV2(include_top=True, weights='imagenet', classes=1000)
The preprocessing function takes an Image instance as its input and outputs the processed features that the ML model consumes. In this example, each image in the Image object is transformed via tf.keras.preprocessing.image.img_to_array followed by mobilenet_v2.preprocess_input.
[5]:
# The preprocessing function
def preprocess(images):
    data = []
    for i in range(len(images)):
        im = tf.keras.preprocessing.image.img_to_array(images[i].to_pil())
        data.append(np.expand_dims(im, axis=0))
    data = np.concatenate(data, axis=0)
    mobilenet_v2.preprocess_input(data)
    return data
Let’s check the predicted labels of this test image.
[6]:
input_img = preprocess(img)
predictions = model.predict(input_img)
top_indices = np.argsort(predictions)[0, ::-1][:5]
r = tuple((i, idx2label[i]) for i in top_indices)
print(r)
((243, 'bull_mastiff'), (242, 'boxer'), (282, 'tiger_cat'), (281, 'tabby'), (292, 'tiger'))
To initialize GradCAM, we need to set the following parameters:
model: The ML model to explain, e.g.,tf.keras.Modelortorch.nn.Module.preprocess: The preprocessing function converting the raw data (aImageinstance) into the inputs ofmodel.target_layer: The target convolutional layer for explanation, which can betf.keras.layers.Layerortorch.nn.Module.mode: The task type, e.g., “classification” or “regression”.
[7]:
explainer = GradCAM(
model=model,
target_layer=model.layers[-5],
preprocess_function=preprocess
)
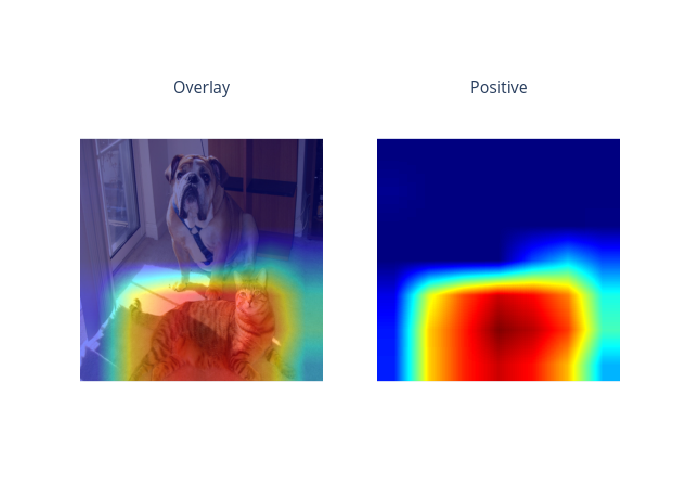
# Explain the top label
explanations = explainer.explain(img)
explanations.ipython_plot(index=0, class_names=idx2label)
[8]:
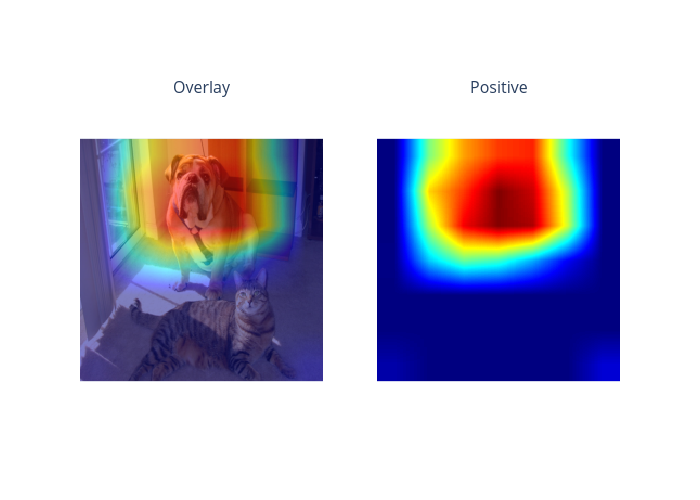
# Explain another label
explanations = explainer.explain(img, y=[281])
explanations.ipython_plot(index=0, class_names=idx2label)